Warning! Aeon no longer uses the Code/Configuration tabs as of version 4.0.
The Server Addon tab in the Aeon Customization Manager facilitates the installation and management of custom Server Addon scripts that you can create to perform certain processes automatically without staff intervention, such as routing items and adding or removing flags.
Unlike client addons, server addons run in the Aeon System Manager. They are stored in the ServerAddons database table instead of the file system, and can be created and modified easily from within the Customization Manager. The ServerAddons table stores the name, configuration (config.xml), and LUA script for each server addon you have created.
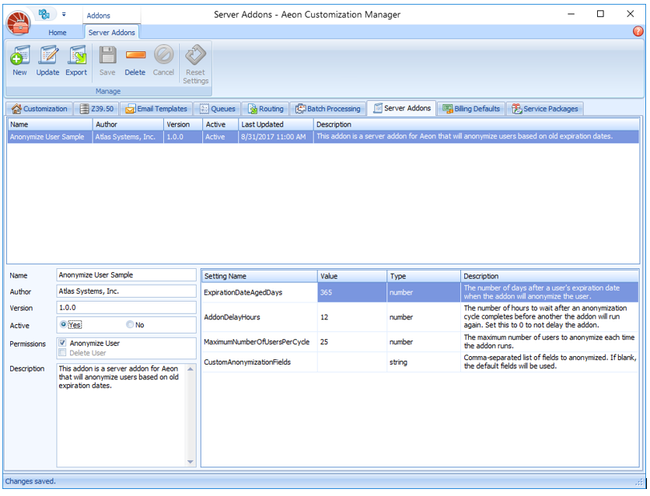
Server Addons in the Customization Manager
Similar to the client manage addon form, each setting can be configured in an easy to use interface rather than modifying XML. Server Addons are administered within the Customization Manager from the Server Addons Tab. The following functions are available from the Server Addons ribbon:
- New: Opens a File Open dialog to upload a new Addon package (zip file)
- Update: Works the same as the New button but will update the currently selected addon with a new version.
- Export: Exports an addon with the default package settings
- Save: This button is enabled when pending changes exist.
- Delete: This will remove the currently selected addon. This cannot be undone. The next time the system manager addon interval kicks off, this addon will stop executing.
- Cancel: If there are any pending changes, they will be canceled and will return to the currently saved state of the addon.
- Reset Settings: This will reset any customized settings back to the package defaults. The save button will need to be clicked to save the reset settings back to the database.
Installing a New Addon
- Save the Addon .zip folder in an accessible location. This folder may have been downloaded from the Aeon Addon Directory or created for you by Atlas or a local software developer.
- Click the New button in the Server Addons ribbon of the ILLiad Customization Manager.
- A dialog window will open with a prompt to select a file to upload. Navigate to the Addon .zip folder and upload by clicking on the Open button.
- The Addon will be inactive by default. Activate the Addon with the Yes option in the lower left window.
- Edit values as necessary in the lower right window.
- Save changes with the Save option in the Server Addons ribbon.
Server Addons are not activated when installed. Be sure to activate the Addon with the Yes radio button in the lower right window.
The name of the Addon can be modified in the editing window on the lower left. This will not save the underlying config.xml but can be modified to create an alias for a particular addon when viewing it in the Customization Manager.
Editing Server Addons
To edit the values in a server Addon:
- Select the Addon to edit from the grid list just beneath the Addons tab.
- Edit values as needed in the lower part of the screen. Editable fields are:
- Name
- Active
- Value (in table on right)
- After editing, the Save and Cancel options will become active.
The Reset Settings will restore only the changes in the Values column to the default settings when Addon was initially installed.
Updating A Server Addon
- When a new version of an Addon is available, select the Update button.
- A dialog prompt will allow you to select the new version to load.
- The new version will now display.
The updating process does include validations checks which will warn you if there are problems with the Addon update such as if you attempt to update to an older version, if required files are missing, or if a new version removes an existing value.
If the System manager uses an external assembly, you will be prompted to restart the System Manager.
If the Addon does not convert successfully, or a non-Atlas Server Addon needs to be added after 4.0 has been installed:
- Copy the config and save as config.xml.
- Save the lua as an actual lua file.
Ensure all lua files are referenced in the Files element of the config.xml as shown here: <Files> <File>TwilioSMSNotifications.lua</File> </Files>
Zip both the the config.xml and the code file(s).
Exporting an Addon
Users may choose to export an Addon with the default settings. The default file name will be the Addon name with a zip extension. The initial directory is set as the last directory used when uploading or exporting an Addon. If the user has never uploaded/exported an Addon, it is set to the base path of the Customization Manager. The last used directory is saved as in user settings for the Customization Manager so it will be specific to each windows profile user.
- Select the Addon to be exported from the grid list.
- Click the Export button from the Server Addons ribbon.
- A dialog prompt will open to all you to select the desired location for the exported files and/or edit the file name.
- The Addon will be exported as a .zip file and can be installed on another ILLiad instance.